Susie Monday

Artist, maker, teacher, author, head cook and bottlewasher.

Sign up here for monthly newsletters from me!

The art I make is the result of a life-long love of pattern, texture and color. How I teach is a skill honed by experience (I started teaching creative arts to younger kids when I was 12). After earning a B.A. in Studio Arts from Trinity University, I helped lead an internationally recognized educational foundation, designed curriculum exhibits for schools and other institutions, wrote and edited for a major daily newspaper, opened the San Antonio Children's Museum and then, a dozen years ago, took the scary but essential (for me) leap to become a fulltime artist and art teacher.

About This Blog

This weblog is about the maker's life. The teacher's path. The stitching and dyeing and printing of the craft of art cloth and art quilt. The stumbling around and the soaring, the way the words and the pictures come together. Poetry on the page and in the piecing of bright scraps together. The inner work and the outer journeys to and from. Practicalities and flights of fancy and fearful grandeur, trivial pursuits and tactile amusements. Expect new postings two or three times a week, unless you hear otherwise. 

To reach me, leave a comment after a post, OR email me at susiemonday@gmail.com 


To receive a notice of new posts in your email, scroll down this column to the end of the page and subscribe via FEEDBLITZ or add this blog to your own subscription service. You can search the blog with any phrase or word, by typing it into the seach window below:

Subscribe .. Or Write Me!

Subscribe to a email feed of this blog by filling in your email address in this box. Your email will not be sold or shared with others.


Preview | Powered by FeedBlitz


  • Contact Me

    This form will allow you to send a secure email to the owner of this page. Your email address is not logged by this system, but will be attached to the message that is forwarded from this page.
  • Your Name *
  • Your Email *
  • Subject *
  • Message *
Login

Entries in Quilt Applique (8)

Friday
Aug052011

More Mermaid

The Lisa Call online workshop "Working in a Series" is doing its work on me. Deadlines work for me. Here's the first assignment completed. I won't give a lot of details as to the assignments, as that is proprietory information that is part of the course, but I will say that this one pushed me to a piece of work that I really like and that combines the kind of graphic clarity with my patterned texture work that is hard for me to find. 

Keeping at it, this will be the first of a new Sirena series, with five or six new large pieces to result (this [pieceis about 4' by 5'). I feel like I am breaking out of a long, slow slump into some new energy in my work. I find that the right teacher and the right learning experience for me can really help me in my studio practice. As artists, we spend a lot of time in our own little heads, solo. Having to interact in a creative setting, being the follower instead of always being the leader offers a certain kind of vacation, a kind of social interaction that is very valuble for my creative process.

I was once asked by a teacher/artist whom I really respect why I continue to take workshops. She doesn't, feeling that her focus is set and self directed, and that taking classes is a waste of energy and direction, can take her off her track. I don't feel that way -- first, I teach a lot of intro technique classes and some workshops are fodder for that mill -- I need to keep up on the latest and greatest. But others, like this one that I am taking now, are real soul food. Something I need to feed my artist self and to keep me honest, to keep me on task, to remind me of what is important in my work. 

Yes, choose carefully. Avoid being a workshop junkie, using courses and workshops to avoid forging ahead on a personal path. But a well-chosen workshop, retreat or class can be just what the spirit ordered. A time to give over the reins for a time, a time to refresh the creative flow, to have deadlines outside of one's own choosing (and divorced from "entry" deadlines that have their own baggage of procrastination) and even a time to make mistakes, to do "not-so-perfect" work and to have a failure or two!

Tuesday
Jul132010

How to Make an Art Quilt, Again

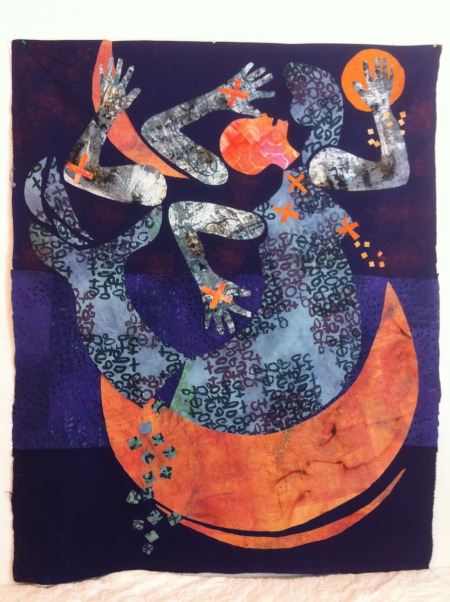
One of the most-read posts I've made on this blog has to do with my process of making an art quilt. Interesting enough, the piece I was working on (a large Virgin/pomegranate figure) got stuck in the middle, even as I was writing about the process.

Did I tell you about that? Nope, don't think so.

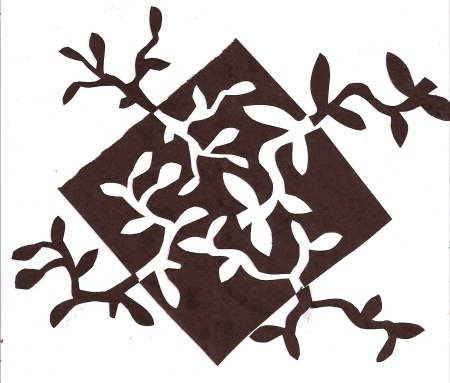
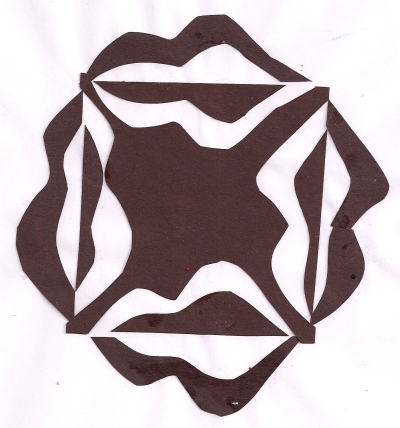
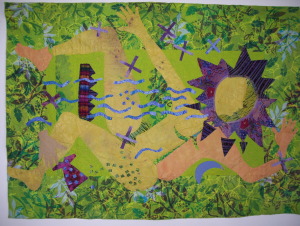
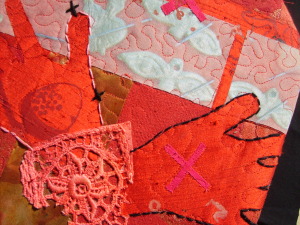
I finally finished the piece after about 5 months of mulling and muttering, just in time for it to go into an invitational exhibit at the Kerr Arts and Cultural Center. Then, as is a sneakly (surprises me, every time) and productive little pattern of mine, I quickly made two other related pieces, spin offs from the theme that emerged as I was mulling and muttering (and as you  will see, slashing off about one half of the original quilt).

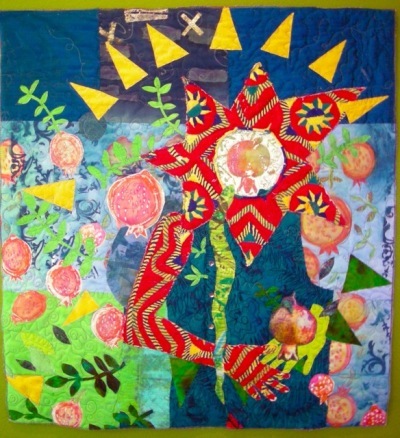
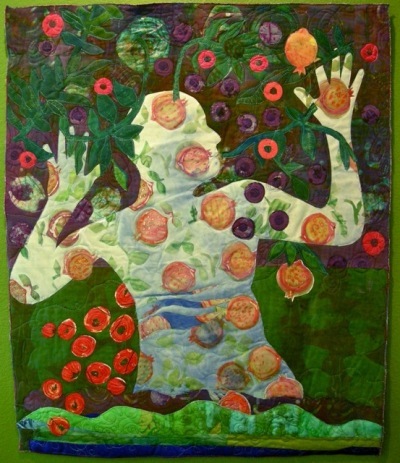
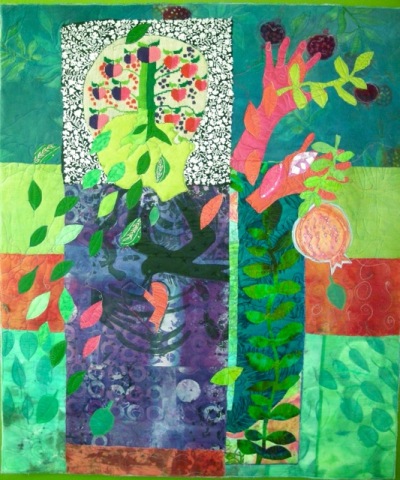
These are all inspired by the story of Persephone, her acceptance of her role as Queen of the Underworld, her visit over the River Styx and her mother Demeter's weeping over the loss of her daughter.

The colors are off in these photos, silly me, I shot the pics with the pieces on the new brilliantly chartruese walls in my hallway, which taught the camera some weird color tint, and I couldn't quite adjust them back. So, that's a good reason to go to Kerrville to see the originals, right?

Then, as I prodded along on my also stalled-out-for-months online course, TEXT ON THE SURFACE, I finally made it the next to last chapter and did another stab at describing my process of design and production.

Here it is. Hope you enjoy this flurry of self-examination on my part, and that it inspires you to consciously think about and write about your own process of work and how you got there. If you post something on a blog or website, please leave a link in the comments, so we can share each other's insights and an appreciation of the diversity of our creativity. So here it is, straight from the auxillery info in the course:

How I make an art quilt (and why I got that way):


Let’s start with the history - I come to quilting from an art background, as a painter. I never have learned proper quilting skills I fear, though I am getting better with piecing and bindings and the like!
Even in my undergraduate studies as a studio art major, I was drawn to stitch  -- my senior project and exhibit was actually an installation or large stained canvases and stitched and sewn stuffed sculptures that were made from paper bags (need I mention that I was in art school in the late ‘60s).
I formally entered the world of textile/fiber art with I started studying with Jane Dunnewold and with the guest artists she brought to the Southwest Craft Center (now Southwest School of Art and Craft). I started dyeing and printing fabric and then had to have something to do with it. Not being a garment mater (due to bad early history in Home Ec in the 8th grade) I thought I would try making wall hangings -- and I had done a lot of collaborative fabric stitched pieces with kids during my career in arts and education. I took a weekend workshop from Sue Benner and discovered for the first time the world of WonderUnder, and that I did’t have to be good at sewing to make a quilt. And that I didn’t have to bind the edges.


So that set me free and I developed my approach over the past 12 years. When I turned 50 I decided that if I was ever to be a “real” artist and do my work, I had to stop working full time for other companies, nonprofits, etc, and just leap on faith that I could support myself somehow as an artist. So far, it’s worked.


So, on to the work:
I start always with an inkling of an idea or story or theme, then I play with colors and textures. piling up fabrics that catch my eye and please my color sensibilities. Most of the fabrics I use are recycled from something else, then dyed, stamped, stenciled, screen printed, etc. I use a good deal of ethnic embroidery, embellishments and pieces of hand-woven fabric from indigenous people around the world. Almost all of these treasures I find at thrift stores.


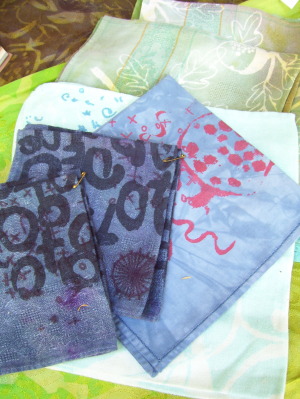
The majority of my dyed and printed yardage also starts with recycled fabrics -- table linens, dresses and skirts, botls and scraps tucked away at flea markets, old cotton sheets and even mattress covers and old quilts for the batting layer. I like it that the fabrics I use have history, stories I don’t even know about. I do buy some new shantung silks from Indian sari stores, usually overdyeing the original color with a wash or glaze of something else. I also purchase bolts and bolts of fusible webbing, new batting and, sometimes, felt for lining small quilts.


My art quilts are totally non-traditional. I fuse every layer, then free motion quilt them, catching the edges of all the fused pieces. In order to make the quilt as flat and unwrinked as possible, I often”build” the quilt on the batting, designing as i go and fusing as I go, cutting the shapes (sometimes from patterns drawn on the fusible web paper) while still adhered to the release paper or backing paper. I don’t generally have an allover design on paper, but sometimes I work from smaller studies, adapting the design to the new scale.

My stitching is usually very loose, though I like to use it as a kind of drawing tool, adding veins to leaves, lines to hands, sun rays, flower details, wind currents and waves. I put the feeddogs down and use an machine foot with a round opening and put the setting on darn, with everything else on “0”. Probably  my favorite stitch  pattern is a looped back on itself spiral. I really think of the quilting as a kind of scribbling over the surface of the quilt, adding the design element of line and texture. I sometimes take large pieces into the local quilt shop and rent their longarm machine (I’m lucky to have such a resource that is very reasonably priced -- $10 an hour) and do a lot of quilting to get the piece connected with one color of thread -- usually a varigated one -- then I get the quilt home to my Bernina and add more detailed quilting.


When the whole piece is quilted, I take another look, then go in with hand stitching, embellishments occasionally, and over printing with screen-printed patterns or details for more texture -- or to add a little energy to any boring parts of the quilt. I don’t like to have areas that are too quiet.

I use the same techniques on fabric paper/cloth paper as I do with fabric and I like to combine unusual fabrics, papers, photos on fabric, etc. This use of a wide variety of materials is probably one of the signatures of my style. My smaller pieces are often wrapped and stapled around wooden internal frames, built of white wood, nailed and glued. I then blind stitch a backing fabric over the back of the piece, which finishes it more like a proper quilt. I started doing so at the recommendation of Arturo Sandoval who critiqued some of my work when here in San Antonio for a workshop at the Southwest School of Art and Craft. He convinced me that while painters don’t need to finish the back of their canvases, we who are working out of the quilting tradition should do so, because it is just part and parcel of the tradition.


My neighbor Rick Murray is my construction expert. He makes the internal wooden frames that I stretch my smaller pieces around. When I use the frames, I don’t put a fabric back on the pieced quilt. just the batting layer, since it is often a piece of recycled mattress pad from the thrift store!


Like Benner, I finish the edges of my larger, none-frame-mounted pieces with layers and layers of zigzag stitiching around the cut edge of the finished piece. I don’t trim and cut a piece until it is quilted and when I work for a particular size to enter in an exhibit I make the quilt a couple of inches larger in every direction, then cut it to size at the end. I stitch the edges with varied colors of threads and change the width and stitch count often as I stitch around the edge. This is the boring, or shall I say, meditative part of my process!

Wednesday
Apr292009

The Shape of the Matter

I've been playing around with notan expanded squares for years, ever since Jane Dunnewold of Art Cloth Studios showed our class the Japanese exercise. Her explaination is on the tutorial section of the Art Cloth Studios website, so you can go there and get the instructions straight from my source.

As Jane writes, so eloquently (as she always does),

Both symmetrical (the same all around) and asymmetrical (different on each side) designs can be achieved through the use of the expanded square concept. In order for the exercise to be completed successfully, there must be a feeling of balance in the design created. A symmetrical design can still be heavy, ponderous, or boring. If the design is working, it will be interesting and will feel balanced on all four sides. Test this idea by turning your paper as you study a completed design. Does it measure up when rotated and studied? Is it interesting from all directions?


There are many other notan exercises, all of them derived from what is considered a kind of visual meditation sometimes by its practitioners.This example is even simpler in execution. Simply cut a square apart in any way you wish, with the object being to reassemble it with white space in between, making again a pleasing and intriguing balance of white and black, light and dark.

I also like to play with the shapes in multiples, enlarging and reducing them on the copier, then reassembling into a rhythmic shape composition.

These exercises are a neverending source of inspiration for stamps, whole cloth quilts, applique, stencils, screen-printing and other graphic applications to fiber arts. I'd love to see your examples! Like snowflakes, there never seem to be two alike! Here's another site with examples too, from Princeton Online.

And here's a wonderful extension of the discipline into maskmaking by a class at San Jose.

By the way, there is room for one more shape-minded person in June's The Shape of the Matter workshop at El Cielo Studio. We'll be doing notan and lot's of other shape exercises in design, using shape as the structural bones for an art quilt, and more. If you're interested, send me a message via the contact box on the sidebar. Dates are June 26 - 28. For further info, see the workshop page.

And, if you're not overwhelmed with opportunities yet, you can find more shape exercises in our new book -- yes, it's for parents, but each set of activities includes a page for the grownup investigators, too.
Here's the exercises in the Shape section -- plus a whole slew of others that didn't make it into the book. I'd love to hear your ideas, too.

Shape investigations to do on your own:

Explore your home as though it were a museum. What kinds of shapes have you collected, consciously or unconsciously? Make an arrangement of disparate objects that share a shapely characteristic on a bookshelf or windowsill. What would the catalog of these shapes say about you?

As you drive through your neighborhood notice the shapes of buildings, homes, stores and other structures. Do the shapes that you see serve as clues to architectural eras, the history of the street? If yours is a new neighborhood, what historical styles have the builders called upon for inspiration? Shapes of windows, doors, rooflines and facades are your best clues.

Cut or tear shapes from colored paper and collage them to solid colored cards for interesting personal note paper.

Enroll in a ceramics class at a local art center or continuing education department of a local college or university. Or for self-guided exploration buy a 50-pound box of ceramic sculpture clay from a local supplier.

Watch a dance or mime performance (live or recorded) with an eye for shape, how the performers use their bodies and each other to create shapes in space. Some troupes and artists to look for: Mummenschanz (on the web at www.mummenschanz.com), Martha Graham -- who else?


Take a walk along a creek bed or river and visually collect the shapes you see in stones and water.

Dip into Georges Perec’s 1978 Life A User’s Manual, a non-linear novel that uses writing constraints – rules that the writer has imposed on the content and structure of the book – much in the way a visual artist uses shape in the composition of a painting.

Write a haiku each morning for a week about the weather outside your window. (How do constraints of syllable count shape your thoughts?)

Think about how your clothing affects your silhouette as you dress for work or play. Make an effort to wear something that changes your shape and pay attention to its effect.

Collect a specific shape (circles or cones, for example) or specifically shaped objects (manholes, terracotta vases, interesting doors) by photographing throughout a day, a week, a month. Post your collection on a photography website, such as Flickr, to share it with others.

Carve simple shapes using a craft knife into the side of an art gum or white artist’s eraser. Make shape patterns and grids using black stamp pad ink on white paper. Enlarge and reduce and repeat shape patterns using a copier. Can these inspire a quilt or other art project?


Thursday
Apr232009

The Ties that Bind

I've spent most of the past two weeks in a storm of productivity -- and I'm quite happy with all the work I've gotten done, if not a bit chagrined that it seems to take deadlines to get me into this heat of energy in the studio. The show is a three-person show at the newly relocated FiberArt Space and Suchil Coffman organized the theme and put all of us in action.

I've a whole slew of new work -- but it's also old. The theme called me to revisit some small paintings that I had made sometime, I think, in the 1980s. The pieces were made from dreams and some untangling personal work that I did in the 1980s, reclaiming some old stories and rewriting my own past and some painful memories with compassion.  I made new textile pieces from a couple of these paintings, and made some photo copier prints from them, then reshaped them into some new small 8" by 8" by 1.5" pieces.

I also made some small new pieces from photo prints made of details from earlier work -- hands that were part of larger pieces,  turning them into a small series called "Letting Go." And also made some small companion "satellite" works to accompany a larger altar piece now retitled and reworked, "Pomegranate: Fertile Earth."

I won't post the new work (other than these little teaser details) until the show opens, but once the reception is over, I'll put some of these new pieces here on the blog and on the website. If you can't make it to the exhibit, maybe you'll find a piece that needs to be in your collection here on the web. I will, of course, pay FiberArt Space their commission for any work sold as a result of this exhibition!